Introduction
Automatic updates on Ubuntu ensure system and security patches are applied promptly. This reduces the risk of security vulnerabilities being exploited by malicious actors.
Learning how to set up and enable automatic updates is crucial for maintaining a secure Ubuntu system without the need for constant manual intervention.
This article teaches you how to set up and enable automatic updates on Ubuntu using two different methods. It also elaborates on the key advantages and risks of automatic updates on your system.
Prerequisites
- Ubuntu system (this tutorial uses Ubuntu 22.04).
- Access to the terminal.
- A user account with sudo or root privileges.
Setting up Automatic Updates on Ubuntu via the Terminal
There are two methods for setting up automatic updates on Ubuntu: via GNOME or the terminal. Using the terminal offers more control and customization options. Follow the steps in the sections below to enable automatic updates on Ubuntu via the terminal.
Step 1: Install the unattended-upgrades Package
The unattended-upgrades package enables automatic installation of security and other essential updates without manual intervention.
Before installing unattended-updgrades, update the package list:
sudo apt update
After the successful update, move to the next steps.
Install the Package
Run the following command to install the unattended-upgrades:
sudo apt install unattended-upgrades
Verify the Installation
To confirm the service is active and running, enter the following command:
systemctl status unattended-upgrades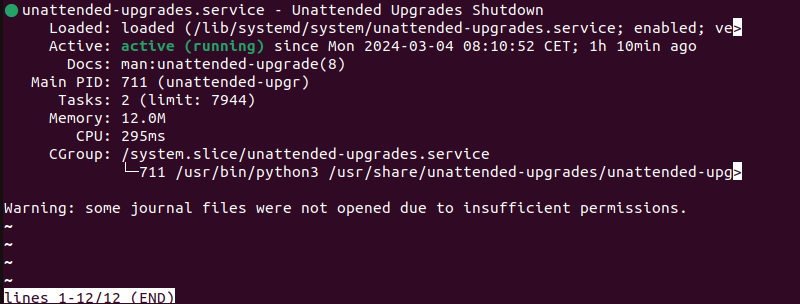
The output confirms a successful installation and the service status.
Step 2: Configure the unattended-upgrades File
After completing the installation, configure individual elements and define the parameters for the auto updates.
This example uses the Vim text editor. However, any other text editor works. Take the steps below to configure unattended-upgrades:
Open the Configuration File
The unattended-upgrades configuration file is in the /etc/apt/apt.conf.d directory.
Access the configuration file with the following command:
sudo vim /etc/apt/apt.conf.d/50unattended-upgrades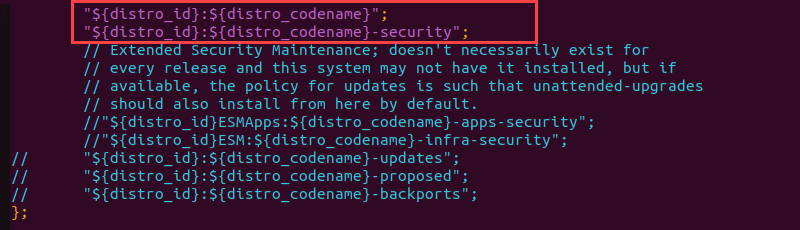
The unattended-upgrades package ignores the commented lines that start with //.
For unattended-upgrades to work effectively, the following lines need to be uncommented in the configuration:
"${distro_id}:${distro_codename}". Specifies the main repository for fetching updates for the specified distribution and codename."${distro_id}:${distro_codename}-security". Determines the security repository for fetching critical security updates.
There is no need to replace ${distro_id} and ${distro_codename} with actual values because they are placeholders that are automatically replaced with the corresponding values of the distribution and codename of the Ubuntu system where the configuration is applied.
Blacklist Packages
Some packages introduce instability or compatibility issues with other software components. By blacklisting these packages, sysadmins prevent unintended disruptions to system stability that result from automatic upgrades.
The Unattended-Upgrade::Package-Blacklist config file section allows users to block upgrades for specific packages.
To do so, add the desired package name to the list. Remember to remove // to uncomment the line. In this example, we are adding nginx to the list:

Save the changes and exit the file.
Step 3: Enable Automatic Upgrades
Enable Ubuntu automatic updates by editing the auto-upgrades file with the command:
sudo vim /etc/apt/apt.conf.d/20auto-upgrades
This file allows you to define how often the auto updates take place. The lines in the file are:
Update-Package-Lists. Use1to enable auto-update.Unattended-Upgrade. Type1to enable auto-upgrade.AutocleanInterval. Enable auto-clean packages for a specific number of days. For example,APT::Periodic::AutocleanInterval "7"; means the system clears the download archive every seven days.
After making the changes, save and exit Vim.
Step 4: Apply the Changes
To apply the changes, restart the unattended-upgrades service. Run the following:
sudo systemctl restart unattended-upgrades.serviceThe command has no output.
Step 5: Testing Automatic Upgrades
To verify the automatic upgrades are set up correctly, perform a dry run. The --dry run command is only a simulation, and no actual changes take place. Use the command:
sudo unattended-upgrades --dry-run --debug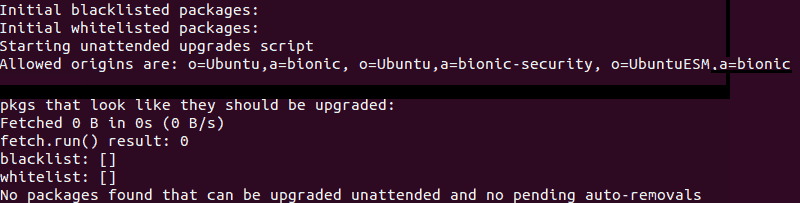
Note: If automatic updates don't work, perform manual update. Get update software list by running the sudo apt update command. Next, update Ubuntu software by running the sudo apt upgrade command.
Setting up Automatic Updates on GNOME
GNOME provides an intuitive graphical user interface (GUI) that simplifies configuring system settings, including automatic updates.
To set up automatic updates on GNOME, take the following steps:
Step 1: Access the Software & Updates App
To access the Software & Updates app, do the following:
1. Click the Show Applications icon in the bottom right corner.
2. Type in Software & Updates in the search box.
3. Select the Software & Updates icon.
Step 2: Enable Automatic Updates.
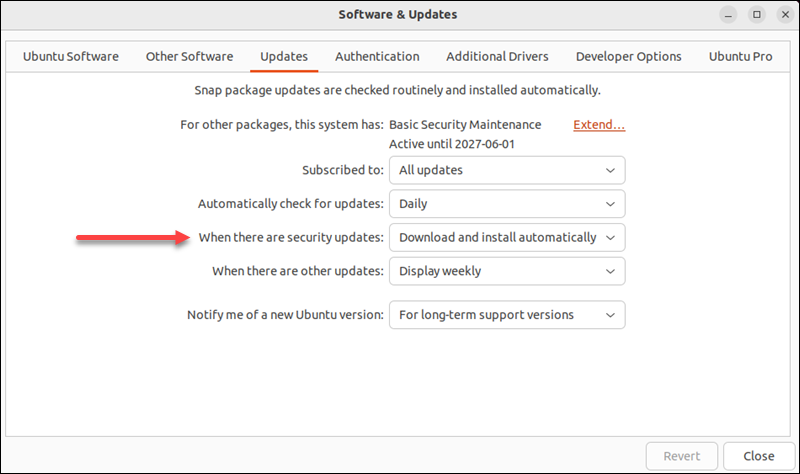
Once in the Software & Updates app, do the following:
1. Open the Updates tab.
2. Find the When there are security updates section.
3. Select Download and install automatically.
Setting up Email Notifications for Ubuntu Updates
Email notifications provide immediate awareness of available updates for Ubuntu, ensuring the system administrators stay informed about critical patches and security fixes. To enable email updates, take the following steps.
Step 1: Open the Configuration File
Access the configuration file via a text editor of choice. For instance, with Vim:
sudo vim /etc/apt/apt.conf.d/50unattended-upgradesStep 2: Find the Email Configuration Section
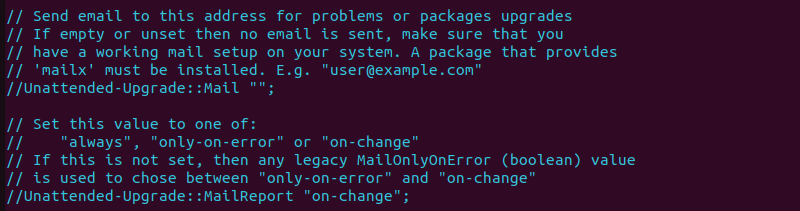
Scroll down until you reach the section starting with Send email to this address for problems or packages upgrades. The section is commented. To send emails, you must uncomment the lines explained in the next step.
Step 3: Enable Email Notifications
To enable email notifications, remove // and edit the lines as follows:
//Unattended-Upgrade::Mail "". This line specifies the email address where to send notifications. Remove the//symbol and add the actual email address to ensure the notifications are sent to the desired recipient.
For instance, the following example uncomments the line and adds sara@email.com as email:

//Unattended-Upgrade::MailReport "on-change";. This line determines whether emails are sent only when errors occur during the update process or for all updates, regardless of whether an error occurs.
For instance, the following example removes the // symbol and sets the value to "only-on-error":

Once finished, save and exit the file.
Note: For the email notification system to work, the mailutils package needs to be installed on the system. If it's not, run sudo apt install mailutils.
Risks of Automatic Updates on Ubuntu
While convenient, automatic updates on Ubuntu come with certain risks:
- Less control over updates. Automatic updates lead to less control over what gets updated and when, which causes compatibility issues or unwanted changes.
- Bandwidth and resource consumption. Automatic updates consume bandwidth and system resources, which is particularly a problem if the internet connection is slow or limited.
- Compatibility issues. Updates sometimes introduce compatibility issues with certain applications or devices, especially with older or custom software or hardware configurations.
- Installation of unwanted features. Updates sometimes install unwanted or unnecessary features, impacting system performance or user experience.
- Interference with work. Automatic updates interrupt work by prompting restarts at inconvenient times or by causing unexpected errors or crashes.
Benefits of Automatic Updates on Ubuntu
Despite the drawbacks, automatic updates streamline the process significantly. The top automatic updates benefits on Ubuntu are:
- Patching security vulnerabilities. Automatic updates ensure security patches are applied promptly, reducing the exposure to known vulnerabilities and enhancing system security.
- Saving time. Automating the update process eliminates the need for manual intervention, saving time and effort for system administrators.
- Bug fixes. Updates address known issues or bugs and improve system stability.
- Performance improvements. Updates often include optimizations that enhance system performance and efficiency.
- Access to new features. Updates bring the latest features and enhancements, providing users with access to improved functionality and capabilities.
Conclusion
By following this guide, you have successfully installed, configured, and enabled automatic security updates on Ubuntu.
Next, learn how to update the Linux kernel in Ubuntu.
