Introduction
The chgrp command changes the ownership of a directory or file in Linux. Each file is associated with an owning user or a group and has rules defining which users or groups can read, write, or execute the file.
In this tutorial, you will learn how to use the chgrp command to change a file's group ownership.
Prerequisites
- A system running Linux
- A user account with sudo privileges
- Access to a terminal (Ctrl+Alt+T)
What Is the chgrp Command?
The chgrp (change group) command alters the group name that a file or directory belongs to. Each file in Linux is created by a user, while each user belongs to groups. By changing the group ownership of a file, the permissions to access and modify a file changes as well.
Since the chgrp command requires superuser permissions, remember to run the command with the sudo prefix for proper execution.
Note: The chown command changes the owning user. When using chown, you need to specify the user and group name, while chgrp only requires the group name.
chgrp Command Syntax Explained
The chgrp command syntax is:
chgrp [OPTION] [GROUP_NAME] [DIRECTORY/FILE_NAME][OPTION]- Additional options. You can use the command without them.[GROUP_NAME]- The group you want to assign the file to.[DIRECTORY/FILE_NAME]- The target directory/file.
The [OPTIONS] are:
| OPTION | DESCRIPTION |
|---|---|
-f, --silent, --quiet | Executes the command without displaying any error messages. |
-v, --verbose | Outputs the action details for every file processed. |
-c, --changes | Similar to --verbose, but reports only when making a change. |
--dereference | Affects the referent of each symbolic link, rather than the symbolic link itself. |
-h, --no-dereference | Affects symbolic links instead of any referenced files. Use this option only on systems that can change the ownership of a symlink. |
--no-preserve-root | Does not treat '/' specially (default setting). |
--preserve-root | Fails to operate recursively on '/'. |
--reference=RFILE | Changes a file's group name to the group name of the referenced file. |
-R, --recursive | Operates on files and directories recursively. |
-H | If a command line argument is a symbolic link to a directory, traverses it. Used in combination with the -R option. |
-L | In a recursive traversal, traverses every symbolic link to a directory that is encountered. Used in combination with the -R option. |
-P | Does not traverse any symbolic links. This is the default if -H, -L, or -P aren't specified. Used in combination with the -R option. |
--help | Displays the help file and exits. |
--version | Outputs version information and exits. |
The [GROUP_NAME] attribute is the new group that the file or directory acquires upon execution. You can also specify the group ID (GID) instead of the group name by appending it with the + sign.
Note: Find out a group ID by running id -g [Username]. Note that you must be a member of that group to be able to see the ID.
The [DIRECTORY/FILE_NAME] is the target directory or file name whose group affiliation you want to change.
You can check which group a file or directory belongs to by running the following command:
ls -lThe output lists the group ownership as in the image below:

In this output, the ls command shows the details of each file and subdirectory contained within the phoenixNAP directory. The owner and group of each file and directory here is bosko.
chgrp Command: 5 Examples
Take a look at five examples how to use the chgrp command. Below you will find commands and sample outputs for changing directory group ownership, changing the group ownership to match a reference file, displaying execution details, and hiding command errors.
Change Directory Group
If you want to change a directory group ownership, place the directory name in place of the [FILE_NAME] attribute in the command:
chgrp [GROUP_NAME] [DIRECTORY_NAME]Take a look at the group name of the directory example before and after using the chgrp command. The group of the directory was changed from the default bosko to phoenixnap using the command:
sudo chgrp phoenixnap example
Recursively Change Group Ownership
The -R option allows you to recursively change the group ownership of a directory, any of its subdirectories, and all of the contents inside. The syntax is:
sudo chgrp -R [GROUP_NAME] [DIRECTORY_NAME]For example, the following command changes the group affiliation of the example directory and all its files:
sudo chgrp -R phoenixnap example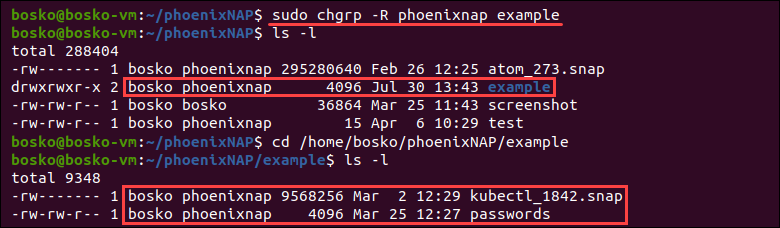
In the image above, you see that files inside a subdirectory of example also have phoenixnap group ownership.
Change Group to Match Reference File
If you want to change the group of a file to match the group of another, reference file, use the following syntax:
chgrp [OPTION] --reference=[RFILE_NAME] [FILE_NAME]The [RFILE_NAME] syntax is the name of the reference file, while [FILE_NAME] is the name of the target file.
For instance, to change the group ownership of the file atom_273.snap to be the same as that of the test file, you would run:
sudo chgrp --reference=test atom_273.snap
Display chgrp Execution Details
The -c option allows users to see a list of changes chgrp has made to each file specified. The list is helpful if you want to make sure the changes are correct. To see the changes applied, use the command:
sudo chgrp -c -R [GROUP_NAME] [DIRECTORY/FILE_NAME]To list the changes that happened in our example directory, we would run:
sudo chgrp -c -R bosko exampleIn this case we changed the group of the example directory and all its containing files, and chgrp lists all the changes as they occured.

Hide chgrp Command Errors
The -f option allows users to suppress potential error messages when executing the chgrp command. The syntax for hiding command errors is:
sudo chgrp -f [GROUP_NAME] [DIRECTORY/FILE_NAME]For example, here we used the chgrp command on a non-existent file:
sudo chgrp phoenixnap nonexistentfileThe output displays that it cannot access the file because there is no such file or directory.
However, running the same command with the -f option suppresses this error:

Conclusion
You now know how to use the chgrp command to change the group ownership of a file or directory. You also know how to customize the process using the available options.
Find other useful commands in our Linux commands cheat sheet.
