Introduction
The BMC portal allows you to easily set up Rancher-managed Kubernetes clusters using Bare Metal Cloud servers. Use the portal to deploy a Rancher management cluster or provision a workload cluster alongside a management cluster.
This tutorial guides you through the process of setting up a Rancher management cluster with a workload cluster. The guide covers the deployment and management of Rancher workload clusters via both the BMC portal and API.
Prerequisites
- BMC portal credentials.
- SSH key pair (Read how to create SSH keys for instructions.)
Create Kubernetes Cluster with Workload Cluster
The BMC portal lets you provision a Kubernetes workload cluster during the Rancher deployment process. Deploy a Rancher-managed workload cluster in the BMC portal by following the steps listed below.
Note: The following procedure allows you to provision a workload cluster provided by phoenixNAP. Once Rancher is deployed, use its interface to add workload clusters from multiple providers. For steps to add a cluster in Rancher UI, read how to add a Kubernetes cluster to Rancher.
1. Log in to BMC portal.
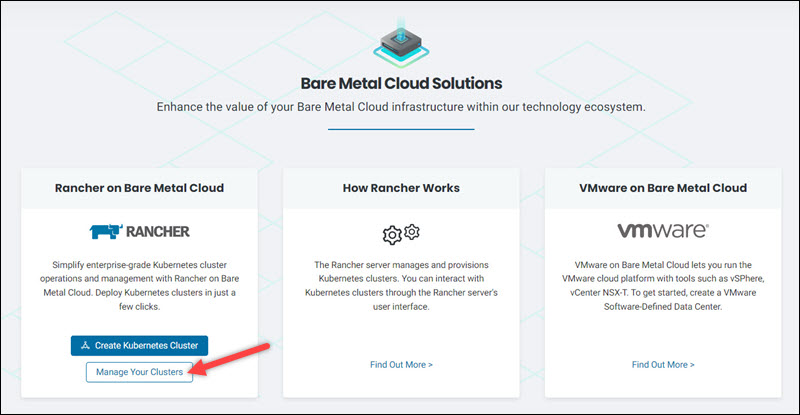
2. Click Solutions in the menu on the left side.
3. Select the Create Kubernetes Cluster button in the Rancher on Bare Metal Cloud tile.
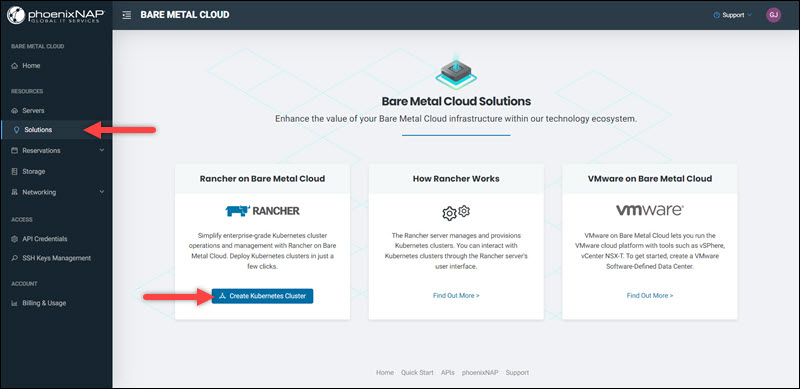
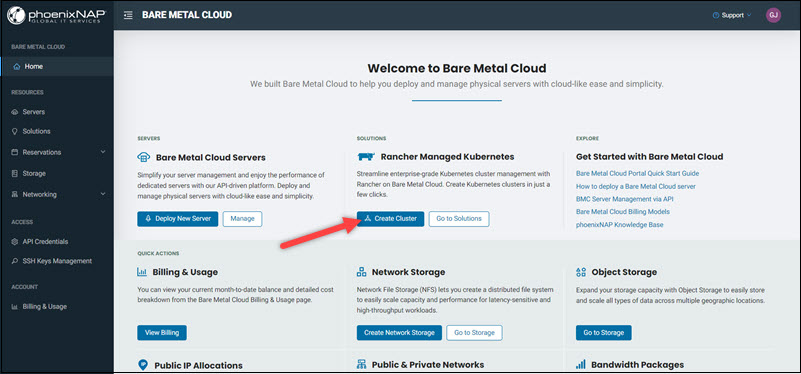
Alternatively, select the Create Cluster button on the Bare Metal Cloud Home page.
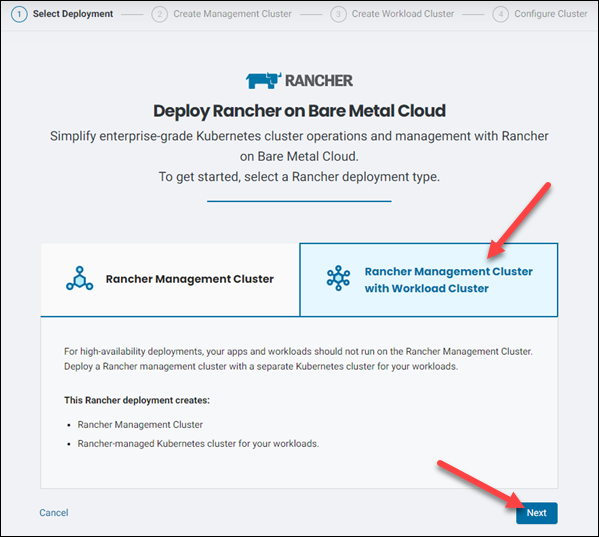
4. Select the Rancher Management Cluster with Workload Cluster tile in the next window. Click Next to proceed.
5. Choose the server location, the number of nodes, and the instance type for your management cluster. For detailed instructions, read how to deploy a Rancher management cluster.
6. Repeat the procedure from Step 5 to create the workload cluster.
7. Provide names for the clusters. Optionally, expand the Add Description option to provide a cluster description.

8. Configure the SSH access, public IPs, and advanced settings to finish deploying your cluster. Refer to configure cluster settings and how to start the Rancher cluster for detailed instructions.
Manage Clusters
The available management actions and their location in the portal depend on whether you want to access the options for Rancher management or workload clusters.
Rancher Management Cluster Options
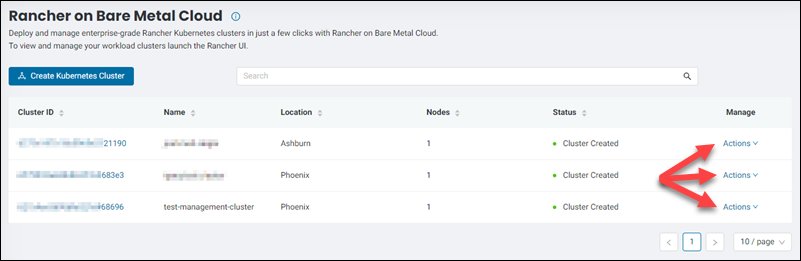
After you create your first cluster, the Manage Your Clusters button appears in the Solutions section. Access the Rancher cluster dashboard by clicking the button.
The dashboard enables launching the Rancher UI, viewing the details of the cluster and information about the nodes, and deleting the cluster.
The available actions are accessible via the Actions link on the right side of each server instance.
Read how to manage Rancher clusters for detailed information on managing this type of clusters in the BMC portal.
Note: Check out our in-depth tutorial for Rancher Node Drivers.
Managing Workload Clusters
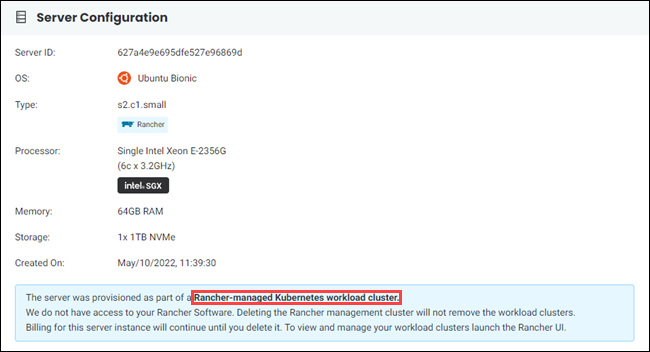
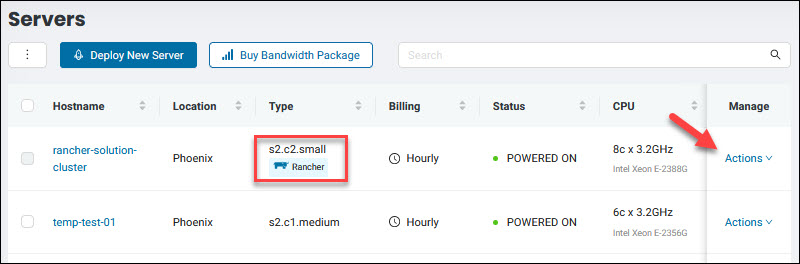
Rancher Workload clusters in BMC are regular BMC server instances. To find the servers deployed as part of a workload cluster, navigate to the server list in the Servers section of the portal.
Identify the Rancher servers by the Rancher tag in the Type column. The workload cluster has the name provided in Step 7 of the Create Kubernetes Cluster with Workload Cluster section.

Select a Rancher server to open the Server Details page. Read the note at the bottom of the Server Configuration section to identify the server either as belonging to a management cluster or a workload cluster.
Manage the Rancher workload clusters using the Actions button in the upper right corner of the Server Details page.
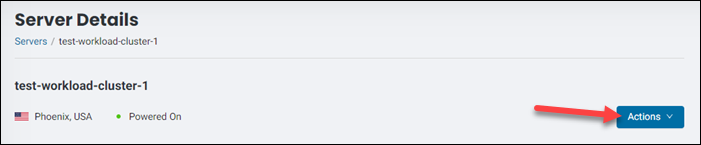
Alternatively, access the management menu using the Actions item on the right side of the Servers page.
You can manage a Rancher workload cluster like any other BMC server. The Actions menu for a workload cluster also contains the Manage Solutions item, which provides easy access to the Rancher on Bare Metal Cloud section of the portal. For the full list of available actions, refer to server manage actions.
Note: When you delete a Rancher management cluster, the workload clusters associated with it are not deleted automatically. Therefore, you will continue to be billed for them as you would for regular servers until manually removing them from the list on the Servers page.
Provision Rancher Workload Clusters via API
BMC Rancher Solution API allows you to provision both management (upstream) and workload (downstream) clusters in a single POST request. The HTTP request URL for the Rancher solution is:
https://api.phoenixnap.com/solutions/rancher/v1beta/clustersNote: Refer to the Rancher Solution API page for in-depth details.
Use the WorkloadClusterConfig property in the body of the request to provide the parameters for provisioning a workload cluster. The WorkloadClusterConfig property consists of four fields:
name(optional)location(mandatory)serverCount(optional)serverType(optional)
Provide the name for the workload cluster in the name field. The syntax for the field is:
{
"name": "[cluster-name]"
}
If the name is omitted, it is auto generated by the system.
Configure the location of the cluster in the location field by specifying a three-letter location code:
{
"location": "[cluster-location-code]"
}
The workload cluster does not have to be at the same location as the management cluster.
The following is the list of available locations with their corresponding location codes:
- Phoenix (
PHX) - Ashburn (
ASH) - Singapore (
SGP) - Netherlands (
NLD) - Chicago (
CHI) - Seattle (
SEA) - Austin (
AUS)
This field cannot be omitted.
Use the serverCount field to set the number of servers in the cluster:
{
"serverCount": [number-of-servers]
}
You can provision one or three servers. If you omit this field, the system defaults to provisioning one server.
Note: To scale your workload cluster post-deployment, use the templates and the credentials to scale the number of servers in your cluster via the NodeDriver in Rancher UI. The templates are location specific, so the new servers must have the same location.
Specify the server type for your cluster by defining the serverType field:
{
"serverType": "[server-type]"
}
The management and the workload cluster servers do not need to be of the same type. The image below shows the currently available server types:
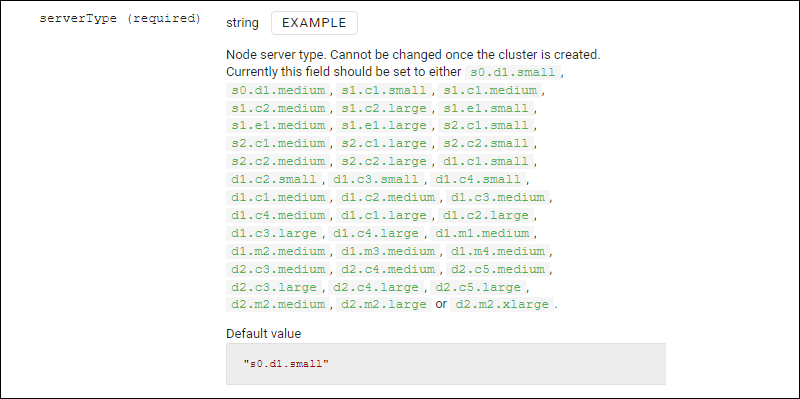
If you omit this field, the default s0.d1.small type will be provisioned.
The following is an example of a POST request to provision a workload cluster named test-workload-cluster, located in Ashburn, and consisting of three s1.c1.medium servers:

The workload cluster provision starts automatically after the management cluster is ready.
Access Rancher UI after provisioning via API
After the clusters have been provisioned, use the information from the response body to access the Rancher UI. The URL, username, and password are listed in the metadata category.

Make note of the password for your Rancher administrative account. You cannot access this password later.
Server Tags
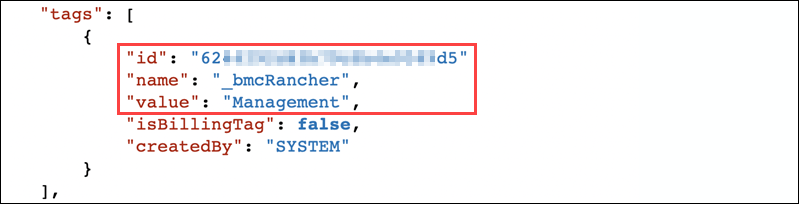
The system assigns a tag to each server during Rancher cluster provisioning. Server tags, which can be accessed on the server listing page, make it possible to identify whether the server belongs to a Rancher management or workload cluster. The following values are important for identifying a Rancher server in the tags category:
id- the server id.name- the type of provisioning. Rancher servers are named_bmcRanchervalue- the field showsManagementfor the management cluster andWorkloadfor workload clusters.
For example, the following is a tag of a server in a Rancher management cluster.
Conclusion
This article showed how to deploy a workload cluster alongside a Rancher management cluster in the BMC portal and via the API.
For more information related to API, refer to the Rancher Solution API. To learn more about the BMC portal features, read our BMC Portal Quick Start Guide.
